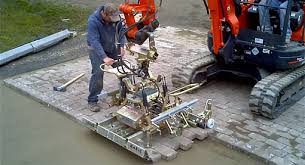
We have mentioned in earlier posts that placing an interlocking or paver pavement is labor intensive. The preparation is similar to placing a flexible pavement. The subgrade has to be graded and compacted. An aggregate layer placed and compacted. The difference is an added 1-inch sand layer. Typically, pavers are hand-placed. There are two techniques to reduce the intensive labor effort. The RoadPrinter (shown in the top photograph) allows laborers to stand while stacking pavers into a herringbone pattern. Note the pre-installed edging. This edge constrains the new pavers. This equipment is used in Europe.
The other installation option uses a small boom with a clamping mechanism to grab pavers off a pallet. This is more common in the United States. Note that the paver pattern must be hand-set on the pallets. It appears the pattern has to be relatively simple – running course or basketweave, to use the clamps.
The key to a long-lasting paver surfaced pavement is installing a structure similar to a flexible (asphalt concrete) pavement. This means good drainage with a thick aggregate base course. Additionally, because of the small, individual segments, the pavers must be constrained by metal edging or PCC curbs.
Hint: Fill the space between pavers with a polymer-modified sand – basically powdered white glue and sand. Once the sand is spread over the pavers, a plate compactor is used to vibrate the polymer sand mix into the void space. The surface is lightly swept then wetted down to activate the white glue. This will lock the pavers into place and will slow traffic deformation and the eventual weeds from popping up.
Top Photograph from roadprinter.ni
Bottom Photograph from “Keeping up with the clamp” by Tom Hatlen, Hardscapemagazine.com

